
How to set up and customize Tracking Page
Synctrack allows you to create a branded Order Tracking Page where your customers can check the delivery status of their orders in real time. This page can be embedded directly into your store and customized to match your brand.
What is the Tracking Page?
The Tracking Page is a dedicated page on your store that lets customers:
- Enter their order number and email or tracking number
- View real-time delivery status and carrier updates
- See shipping history and estimated delivery dates
It helps reduce customer inquiries like "Where is my order?" while providing a seamless post-purchase experience.
How to customize your tracking page
To edit tracking page, go to Tracking Page > Tracking page editor > Customize

The editor is divided into three tabs:
- Order Lookup Page – Where customers enter tracking details.
- Order Status Page – Where customers view the status of their shipment.
- Appearance – Where you customize the design and layout.
1. Order lookup page
The Order Lookup tab is where you set up the search form your customers will use to check the status of their orders. This is the first step in your customer’s journey.
Lookup options
The Lookup options section lets you control how customers search for orders on your tracking page and which types of orders are searchable. You can enable one or more lookup methods and choose which order types customers are allowed to search for.

Allow to search
By default, customers can search for fulfilled shipments with tracking information. You can enable additional order types:
- Fulfilled shipments without tracking information: Allows customers to search fulfilled orders that do not have tracking information. Only basic order details are shown.
- Unfulfilled shipments: Allows customers to search orders that have not been fulfilled yet. Customers can view order confirmation details before tracking information is available.
Lookup methods
You can enable one or more input methods. All selected fields will appear on the form. Only check the boxes you want customers to use for order lookup. Unchecked fields will not be visible.
You can enable any combination of these fields.
- Method 1: Tracking Number. This method is only available for orders with tracking information.
- Method 2: Order ID and/or Email and/or Phone Number
Click edit icon (2) to customize information. Each option has its own customizable fields:
- Label: Field title shown to the customer
- Placeholder: Example text inside the input field
- Error Message (Empty): Message when field is left blank
- Error Message (Invalid): Message when input is incorrect (e.g. email format)
Appearance
You can customize:
- Title, Description, and Button Text to fit your store’s tone
- Message shown when no results are found.
You can upload up to 3 assets to display on the page. Each image can have:
- Uploaded file (PNG, JPG, SVG, up to 1.5MB)
- Optional destination URL (clickable image)
🧩 Pro Tips
- Keep it simple: Avoid overwhelming customers with too many required fields.
- Match your tone: Use language consistent with your storefront and brand voice.
- Preview often: Use the “Preview” toggle to see how the lookup page looks to customers.
2. Order status page
The Order Status Page is what your customers see after they enter their order details. This page should offer a smooth, informative, and branded experience. You can customize everything from shipment progress to product recommendations. You can configure which information you want to show to your customers

Progress bar & Status labels

Customize your fulfillment journey with clear labels and optional icons.
Default statuses
- Ordered
- Order ready
- In transit
- Out for delivery
- Delivered
Custom statuses (optional)
Click Add custom status to insert steps like “In production” or “Packaging”.
Set:
- Status name (e.g., In production)
- Days after ordered to show this status
- Custom icon


Other statuses
Used for edge cases or failed shipments. Use short, friendly names for each status. Avoid jargon like “Exception” unless it’s necessary:
- No Information – Buyer can check the courier page directly
- Courier not supported
- Expired
- Failed attempt
- Exception
- Pending
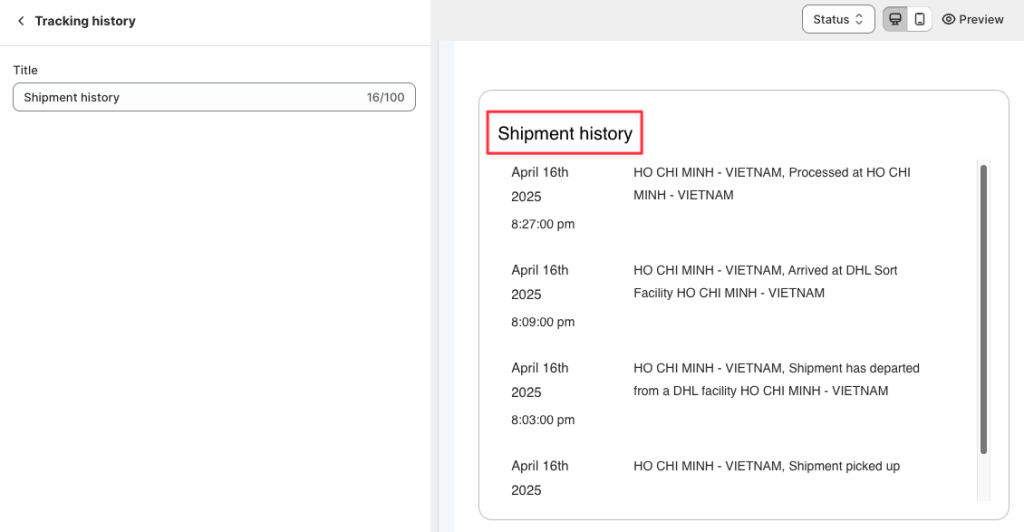
Tracking history
Title: Change the title of the shipment log (default: “Shipment history”)
Order details

Let customers see what’s inside their shipment.
- Title: Header above product info
- Product: Edit the product section label
- Total: Customize total price wording
- Singular/Plural Labels: Personalize the wording for 1 item vs. multiple
Tracking information

Edit field labels for shipping and carrier details:
- Shipment information
- Shipping address
- Tracking number
- Carrier
Images
Upload up to 3 banner images:
- Accepted: .svg, .gif, .jpg, .jpeg, .png (max 1.5MB)
- Optional: Add destination URLs to link the image to a page (e.g., New Arrivals)
Product recommendation (optional)
Show related products to boost reorders.
- Title: Headline (e.g., “You might also like”)
- Type: Choose between: All products, Product types, Product tags
- Product filters: Select specific types or tags to display
Policy & Social Links
Help customers find support and key store policies.
Support & Policies
- Support contact: Label and URL
- Return policy
- Terms & conditions
- Privacy policy
Social Media (optional)
Add links to:
- TikTok
3. Appearance
The Appearance tab allows you to customize the look and feel of your tracking pages—both the Order Lookup Page and Order Status Page—so they match your brand and storefront design.
Theme layout
Choose how your page layout is structured:
- Classic: Fixed-width layout with traditional alignment. Great for minimalist, clean interfaces.
- Modern: Full-width layout with more visual emphasis. Great for immersive, image-heavy styling.
Style
Customize your color palette and text appearance
- Main color: Primary accent
- Text color: Main font color
- Button color: Background color for CTA buttons
- Button text color: Font color for button labels
- Button radius: Adjusts how rounded your buttons appear (slider)
Date and time format
Choose how dates and times appear on tracking logs and shipment status. This is useful for aligning with your store’s regional format (e.g., US vs EU).
Updated on: 10/02/2026
Thank you!